Lesson 3. Customize Matplotlibe Dates Ticks on the x-axis in Python
Learning Objectives
- Customize date formats on a matplotlib plot in Python
# Import required python packages
import os
import pandas as pd
import matplotlib.pyplot as plt
from matplotlib.dates import DateFormatter
import matplotlib.dates as mdates
import seaborn as sns
import earthpy as et

# Date time conversion registration
from pandas.plotting import register_matplotlib_converters
register_matplotlib_converters()


# Get the data
data = et.data.get_data('colorado-flood')

# Set working directory
os.chdir(os.path.join(et.io.HOME, 'earth-analytics', 'data'))

# Prettier plotting with seaborn
sns.set(font_scale=1.5)
# Ticks instead of whitegrid in order to demonstrate changes to plot ticks better
sns.set_style("ticks")
Downloading from https://ndownloader.figshare.com/files/16371473
Extracted output to /root/earth-analytics/data/colorado-flood/.
In this lesson you will learn how to plot time series using matplotlib in Python. You will use the same data that you used in the previous lesson. To begin download the data.
# Read in the data
data_path = os.path.join("colorado-flood",
                         "precipitation",
                         "805325-precip-dailysum-2003-2013.csv")
boulder_daily_precip = pd.read_csv(data_path,
                                   parse_dates=['DATE'],
                                   na_values=['999.99'],
                                   index_col=['DATE'])
# Subset the data as we did previously
precip_boulder_AugOct = boulder_daily_precip["2013-08-15":"2013-10-15"]


# View first few rows of data
precip_boulder_AugOct.head()
| DAILY_PRECIP | STATION | STATION_NAME | ELEVATION | LATITUDE | LONGITUDE | YEAR | JULIAN | |
|---|---|---|---|---|---|---|---|---|
| DATE | ||||||||
| 2013-08-21 | 0.1 | COOP:050843 | BOULDER 2 CO US | 1650.5 | 40.0338 | -105.2811 | 2013 | 233 |
| 2013-08-26 | 0.1 | COOP:050843 | BOULDER 2 CO US | 1650.5 | 40.0338 | -105.2811 | 2013 | 238 |
| 2013-08-27 | 0.1 | COOP:050843 | BOULDER 2 CO US | 1650.5 | 40.0338 | -105.2811 | 2013 | 239 |
| 2013-09-01 | 0.0 | COOP:050843 | BOULDER 2 CO US | 1650.5 | 40.0338 | -105.2811 | 2013 | 244 |
| 2013-09-09 | 0.1 | COOP:050843 | BOULDER 2 CO US | 1650.5 | 40.0338 | -105.2811 | 2013 | 252 |
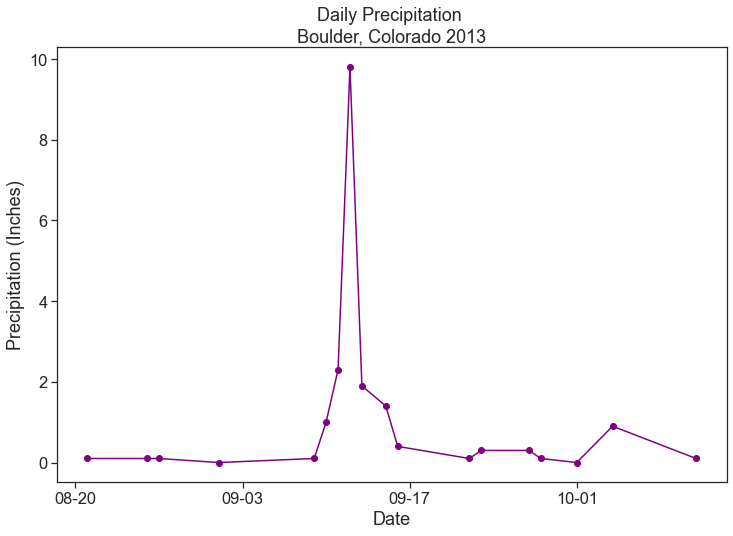
Plot the data.
fig, ax = plt.subplots(figsize=(12, 8))
ax.plot(precip_boulder_AugOct.index.values,
        precip_boulder_AugOct['DAILY_PRECIP'].values,
        '-o',
        color='purple')
ax.set(xlabel="Date", ylabel="Precipitation (Inches)",
       title="Daily Precipitation \nBoulder, Colorado 2013")

# Format the x axis
ax.xaxis.set_major_locator(mdates.WeekdayLocator(interval=2))
ax.xaxis.set_major_formatter(DateFormatter("%m-%d"))

plt.show()

Reformat Dates in Matplotlib
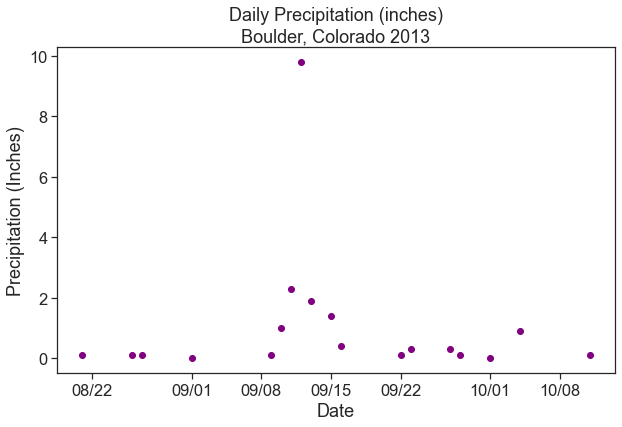
You can change the format of a date on a plot axis too in matplotlib using the DateFormatter module.
To begin you need to import DateFormatter from matplotlib. Then you specify the format that you want to use for the date DateFormatter using the syntax: ("%m/%d") where each %m element represents a part of the date as follows:
%Y - 4 digit year %y - 2 digit year %m - month %d - day
To implement the custom date, you then: define the date format: myFmt = DateFormatter("%m/%d")
This a date format that is month/day so it will look like this: 10/05 which represents October 5th. Here you can customize the date to look like whatever format you want.
Then you call the format that you defined using the set_major_formatter() method. ax.xaxis.set_major_formatter(myFmt)
This applies the date format that you defined above to the plot.
# Plot the data
fig, ax = plt.subplots(figsize=(10,6))
ax.scatter(precip_boulder_AugOct.index.values,
           precip_boulder_AugOct['DAILY_PRECIP'].values,
           color='purple')
ax.set(xlabel="Date", ylabel="Precipitation (Inches)",
       title="Daily Precipitation (inches)\nBoulder, Colorado 2013")

# Define the date format
date_form = DateFormatter("%m/%d")
ax.xaxis.set_major_formatter(date_form)

X-Label Ticks and Dates
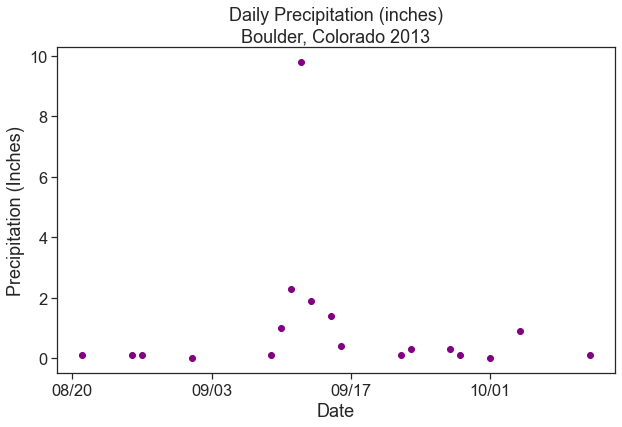
Time specific ticks can be added along the x-axis. For example, large ticks can indicate each new week day and small ticks can indicate each day.
The function xaxis.set_major_locator() controls the location of the large ticks, and the function xaxis.set_minor_locator controls the smaller ticks.
# Plot the data
fig, ax = plt.subplots(figsize=(10,6))
ax.scatter(precip_boulder_AugOct.index.values,
           precip_boulder_AugOct['DAILY_PRECIP'].values,
           color='purple')
ax.set(xlabel="Date", ylabel="Precipitation (Inches)",
       title="Daily Precipitation (inches)\nBoulder, Colorado 2013")


# Define the date format
date_form = DateFormatter("%m/%d")
ax.xaxis.set_major_formatter(date_form)
# Ensure ticks fall once every other week (interval=2)
ax.xaxis.set_major_locator(mdates.WeekdayLocator(interval=2))

You can add minor ticks to your plot too. Given we are using seaborn to customize the look of our plot, minor ticks are not rendered. But if you wanted to add day ticks to a plot that did have minor ticks turned “on” you would use:
ax.xaxis.set_minor_locator(mdates.DayLocator())
mdates.DayLocator() adds a tick for each day.
Additional Resources
Here are some additional matplotlib
Share on
Twitter Facebook Google+ LinkedIn
Leave a Comment